

_edited.png)
Race Execution, Pacing & Final Thoughts

Updated: Sep 2
Part 3 of our 3-part Series on How to Crew for an Ultramarathon
Following our previous discussions on "Crewing Responsibilities" (Part 1) and "How to Organize for Race Day" (Part 2), this final article focuses on optimizing your race-day execution. We’ll explore how to ensure a smooth race while helping your crew feel confident, prepared, and engaged.
This final installment covers:
Planning your Execution
Pacing Charts
Pacers
Miscellaneous Recommendations

Planning Your Execution
You have your nutrition, hydration, and gear sorted—but have you strategized your race effort? Managing your intensity is a critical, yet often overlooked, component of race-day preparation. This strategy can be developed with your coach or through independent reflection during your training. It can be really helpful to review the elevation profile of your race (which you and/or your coach has likely already done in order to properly design your training program) and determine what the best race strategy is based upon the demands of the actual race course. Common considerations would be looking for areas that could hinder your running legs too early in a race (i.e. hammering a downhill too early in the race), determining the needs at the end of the race (i.e. is there a big climb at the end or is it runnable) and applying your own strengths and weaknesses to the course (i.e. you’re a stronger climber than descender and how does that impact strategy). You then break the course down into sections and can add comments, cautions or reminders for each section that help depict your race strategy.
Here is an example that demonstrates how one would do this.

Big climb - don’t overdo your effort here. Ease into the race.
Big descent - Do not push this downhill. So much of the race left - protect your quads.
Settle into the big climb out - keep effort controlled. Use the runnable section at the top of the climb.
Significant distance of net downhill. Can open up more on this one, but still be careful to preserve your legs for the last 35 miles of the race.
Steep climb out of the aid station. Steady pacing, not too hard.
Can start opening up a bit more on the downhills, still conserving on the ups.
Open up on the downhill back to the aid station
This is the critical section of the race - work the uphills with strong pacing.
Should be pushing the more runnable, flatter sections
Open up and give it the rest that you have on the downhill to the finish.
Sharing this strategy with your crew is essential. When your team understands your plan, their "race beta" becomes more effective. If you are intentionally conserving energy early on, they can offer supportive pacing data rather than encouraging a premature chase for position. As you move into the final stages of the race where digging deep is required, your crew can shift their tone to help you find that extra gear. Clear communication ensures your support system is always aligned with your competitive goals.
The other part of planning your race execution can involve having time projections for each of the aid stations to help your crew in knowing when to expect you. This takes practice and some understanding that things may not go according to plan, so your crew still needs to pay attention to how your race is unfolding and know if you’re “ahead of schedule” or “behind schedule.” However, having a pacing chart can help your crew have a better understanding of your race plan and expectation for crewing needs. The next section goes into greater detail on what these pacing charts are and how to build one for yourself.
Pacing Charts
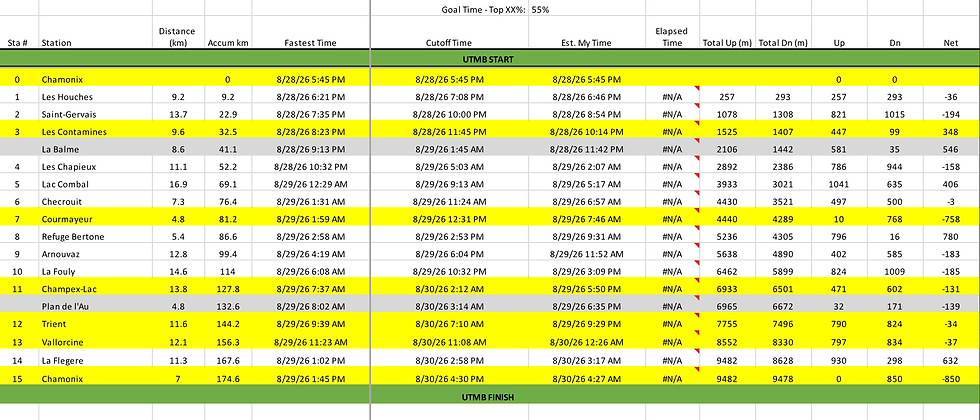
An ultramarathon pacing chart is more than a list of times telling you when you should arrive at each aid station. It is a race-day framework that turns a long, complicated course into a series of manageable sections. Instead of trying to hold one average pace for 50 miles, 100 miles or beyond, the chart gives you a projected time for each segment, an expected arrival at each aid station, the amount of time you plan to spend there, and your projected departure. This approach is particularly useful on trail ultras, where a mile of steep climbing can take dramatically longer than a mile of runnable downhill. On varied courses, aid-station split goals are generally more useful than a single pace-per-mile target because they account for the actual character of the terrain.
The first step in building a useful chart is to start with the course itself. Gather the current race guide, course map, elevation profile, aid-station locations, cutoff information, and any available information about crew access, drop bags, or mandatory gear. Divide the course into the official sections between aid stations and record the cumulative distance, elevation gain and loss, and general character of each section. A section might be predominantly runnable, a long sustained climb, a technical descent, or a combination of several different surfaces. The goal is to understand that every section will demand something different from you. A good pacing chart reflects those differences rather than pretending the entire race is one uniform effort.
One of the best ways to personalize your projections is to study runners who have already completed the same race. Look for athletes whose previous performances resemble the result you are targeting, particularly runners who paced the course intelligently rather than simply starting as fast as possible and fading dramatically. Their aid-station splits can provide a realistic picture of how quickly each section can be completed.
Once you have that reference data, adjust it to make it yours. If the runners you studied averaged a 22-hour finish and your goal is 24 hours, you might scale their individual splits rather than simply adding the same number of minutes to every section. You can also selectively adjust sections based on your strengths and weaknesses. If you are a strong climber but a slower technical descender, your projected climb times might be relatively aggressive while your descent projections are more conservative. This is where the chart stops being a generic race calculator and becomes a personal race strategy.
If it isn’t feasible to compare to another runner you can use race data to help you create your own pacing projections. Some races will have the splits of the course record holder and most, if not all races will have the cutoff times designated throughout the race progression. You can use these two time frames as your outer time brackets - fastest time and time that achieves a finish. This can help you then try to determine where your actual time would fall based on your time goal, interim splits you think you can achieve and attention to your specific strengths and weaknesses. Many times runners will also divide their projected splits into “A Goal” “B Goal” and “C Goal” so there are several windows of time projections, which gives your crew a more realistic window of time to expect you (versus just one time goal that is more conservative and you end up running 2 hours faster, when perhaps you did know this was possible prior to starting the race).
When creating your pacing chart, it is also important to separate moving time from aid station time. A runner might have an excellent moving time projection and still miss a goal because they spend too much time at aid stations. When you’re planning out your gear and hydration/nutrition plan for each aid station you should be able to get an idea of the expected time you’d spend there. A quick bottle refill might require only a few minutes, while a crew station involving food, clothing changes, a drop bag, a shoe change, or a headlamp may deserve considerably more time. Be sure to consider the small pieces of friction that are easy to ignore when planning: walking through the station, finding your drop bag, talking to crew, using the bathroom, and getting everything you need before leaving.
Your chart should therefore show both arrival and departure times. If you arrive at an aid station at 4:20 p.m. and have budgeted eight minutes there, your real race checkpoint is a 4:28 p.m. departure. That departure time determines when the next section begins and, ultimately, when you reach every subsequent checkpoint. This distinction becomes especially important in races with intermediate cutoffs, because some cutoffs apply to leaving an aid station rather than simply reaching it.
Finally, treat the pacing chart as a baseline rather than a contract. The numbers are projections based on assumptions that may change once the race begins. Heat, cold, mud, altitude, congestion, navigation, unexpected technical terrain, fatigue, and how well you are eating and drinking can all alter your actual pace. Your goal is not to force reality to match the spreadsheet. Instead, the chart gives you a reference point: you can see whether you are broadly ahead, behind, or on schedule, and then make intelligent decisions at each aid station. A good ultramarathon plan is therefore not rigid—it is a set of expectations that helps you recognize when and why the race is unfolding differently than expected.
The finished chart should be simple enough to understand when you are exhausted. At minimum, include the aid station or landmark, cumulative distance, segment distance, projected segment time, projected arrival, planned stop time, projected departure, and cumulative elapsed time. Many runners also add notes for nutrition, gear, pacer pickup, darkness, or other decisions that need to happen at a particular point in the race. The best chart is the one you can glance at in thirty seconds and immediately understand where you are, where you expected to be, and what you need to do next.
Most importantly, personalize the chart through your own training. Use long runs, race simulations, climbing efforts, downhill experience, and previous ultras to determine whether the projected splits are genuinely compatible with your abilities. If the chart only works when everything goes perfectly, it is probably too aggressive. If it gives you no room to use your strengths late in the race, it may be unnecessarily conservative. The ideal pacing chart should feel slightly challenging but sustainable, with enough flexibility that you can adapt as the race develops. In an ultra, the chart is not there to tell you exactly how fast to run every mile; it is there to help you make better decisions for the next section of trail.
Here a few examples of Pacing Charts from WildPeak Collective Athletes:


Pacers
Pacers are a vital extension of your crew, often joining you for the most challenging miles of the race. If you are taking on the role of a pacer, your primary responsibility is to remain a steady, reliable resource for your runner. This begins with self-care; ensure you stay hydrated, fueled, and physically ready so you can focus entirely on your athlete's needs. Before the race, familiarize yourself with the specific event rules, including pacer check-in requirements, bib assignments, and "no muling" policies that prohibit carrying gear for your runner.
A pacer’s impact is defined by three core responsibilities:
Aid station assistance
Navigation
Beta / Encouragement
First off, a pacer can provide aid within the aid station. This can mean grabbing their athlete’s bottles or flasks and filling them while the athlete is eating food from the aid station. It can also mean grabbing their drop bag and retrieving the needed gear or resupply items. Many times the pacer can do the finishing touches at the aid station while the athlete continues on the trail and then the pacer runs to catch their athlete once they are finished. For example, the athlete could grab a PB&J and keep hiking out of the aid station while the pacer refills the bottles with water and adds the athlete’s electrolyte mix - however you need to make sure this allowed - some races specify that pacers need to enter and leave the aid station with their runner. Most aid stations also provide aid for the pacers so the pacer could refill bottles and eat any snacks from the aid station. Again, this should be confirmed in the aid station and pacer rules in order to ensure the pacer is adequately prepared for their segment and able to anticipate if they will have access to resupply or not.
The second job of a pacer is to assist with navigation. This doesn’t take all responsibility off of the runner (as they should have studied the course and have a general understanding of each segment), however it is expected that they may be more fatigued, distracted or have greater difficulty navigating efficiently, therefore a pacer can greatly assist in smoothly navigating the course, and following and keeping track of markings. This can be especially helpful on night segments where it is more difficult to follow markings or could be easier to miss turns (in conjunction to where drowsiness and fatigue is certainly heightened).
Finally, a pacer’s role is to encourage their athlete. This involves providing updates on their position, such as their rank in the overall, gender, or age group categories. Before the race, discuss the athlete's strategy and goals with them so you understand what motivates them and what data they actually want to know (i.e. do they have overall placement goals or age group goals or do they not care about their placing and care only about a time goal). This can also include awareness of and assistance in pacing. Perhaps the athlete is chasing a time goal, you can share with them if they are ahead or behind their pacing schedule and can try to gently push them toward appropriate adjustments to help reach their goals. This can be especially important if the athlete is getting close to missing cutoffs. The pacer should be aware of their pacing segment and the applicable cutoffs. The pacer’s job is to provide information on how the athlete is doing and then problem solve how to make up the time or increase the pacing. Sometimes it isn’t possible to get your athlete to make a cutoff if they are behind, but the pacer’s job is to try to see if they can help their athlete find that next gear to make up the time difference and turn things around (and many times this includes getting them to eat or drink, even if they are struggling to do so).
Beyond performance tracking, encouragement includes sharing positive updates, like being ahead of schedule or how well they are holding up compared to the competition. You may also need to offer coaching cues, such as “Focus on deep breathing” or reminders to eat and drink. “Gut fatigue” is common late in an ultra, making it easy for athletes to fall off their nutrition plan, so it is important to try to help keep them accountable to their execution strategy. And don’t forget encouragement can simply be getting excited for them, sharing how great they are doing and telling them good job and keep it up.
Sometimes, encouragement means providing a distraction. If the athlete is struggling, talk to them about life updates or work projects to take their mind off the pain—just keep it to a one-sided conversation so they can listen without needing to respond. Throughout all of this, remain focused on your responsibilities, such as navigation and tracking time, ensuring that providing distractions doesn't cause you to lose your way.
Now that we know what a pacer’s jobs include, it is important to discuss that there are many different ways to pace. You’ll want to figure out what your athlete will respond best to. For example, will you lead them or will they set the pace. If you’re leading your athlete you can set the pace and try to push your athlete to run a little faster (while paying attention to how far back they are and adjusting your pacing so you continue to encourage them to run stronger, without discouraging them by getting too far ahead). You can also try to encourage them to run more of the runnable uphills versus defaulting to hiking because they are fatigued. Whether you lead or follow your athlete will depend on which segment you’re pacing and what your athlete wants (as they’ll know if they will respond well to you being ahead or if it would be discouraging to them). If you’re pacing an earlier segment (i.e. mile 60 in the 100 mile race) the race strategy may not be to push quite yet and therefore it would make more sense for the athlete to set pace and the pacer to follow. However, if you’re in the final segment prior to the finish or if pace is dropping off and your athlete might not make a cutoff, that would absolutely be a time to lead your athlete since you’re trying to push the pace and help them be able to continue on in the race.
Other considerations would be your athlete’s preferences on if they want “chit chat” or if they’ll be using music for distraction. You’ll want to try to get an understanding of what vibe they are wanting while you are pacing them and try your best to create that for them while assisting them in reaching their maximum potential.
Pacers can come up with all sorts of creative ways to help encourage their athletes. The pacer gets to bring the excitement of the moment back to the athlete and hopefully rejuvenate some energy again (versus fatigue causing the athlete to fade or disengage from their race goals). A pacer can try to implement run-walk intervals in the late stage of an ultra or could use visual targets to get their athlete to jog manageable segments between hiking efforts (i.e. “Let’s run to that trail sign just ahead”). Knowing your athlete’s personality can be helpful to find the right way to encourage your athlete to stay strong when they are in the tough segments of an ultra.
After hearing about how a pacer can impact an athlete’s race results it makes sense that choosing the right people as your pacers is important. It is helpful to have someone who knows your strengths and limitations as an athlete, possibly someone who has run with you often and someone who knows you as a friend. However, having someone who is familiar with the race and crewing and has significant experience at ultras can make up for them not knowing you very well (i.e. they know how to handle the “job” of pacing and what questions to ask you prior to their pacing duty in order to execute their job in the best possible way, which makes up for them not knowing you well personally). In some ultras, pacing can be many hours together on the trail and you as the athlete may be in a challenging headspace. Therefore, it can be helpful to have at least an idea of if your personalities will mesh and if the pacers will be a positive enhancement to your racing experience (versus something you regret or something that makes your race more difficult).
Miscellaneous Recommendations
Prepare for anything. The weather can change so quickly or storms can come out of nowhere and nothing is guaranteed. Taking extra precautions such as dry bags or waterproof bags for your drop bags, extra rain coats or extra warm weather gear can save a race outcome if weather changes. [Context from Coach Brittany: “I’ve been at races where during the overnight section it rained continuously and the race organizers hustled to get a pop up tent to cover the drop bags, but this was an imperfect situation where drop bags were out in the open getting rained on and then once they were covered, water pooled in the tarps. It absolutely made a difference for racers who didn’t have waterproof drop bags, especially when they were relying on dry gear during a cold overnight section during a tough ultramarathon.]
It is always recommended to have the course uploaded to your phone and/or your watch. Most races have GPX files available to download which can assist you in knowing the course or problem solving issues if you find yourself unsure if you are still on course. There are many things that can happen that can lead you to getting off course - missing a turn, flags getting taken down, limited visibility making finding course markings difficult to find, wind or rain disturbing course markings, etc. Having the GPX file on your phone (even better if this includes mapping apps that can be utilized when out of service, such as pre-downloading maps on an app such as Gaia GPS) can allow you to see exactly where you are in relation to the course and aid you in getting back on course more efficiently, not to mention more safely. If you have the GPX uploaded to your watch you can get real time tracking and feedback on upcoming turns or notifications if you are off course, which can be helpful in navigating a course you’re unfamiliar with or if there are areas that are more remote.
Being on a crew can be more tiring than you think. The joke is that “CREW” stands for “Constantly Rushing, Endlessly Waiting,” so stress can be high because you don’t want to miss your runner, you’re navigating backcountry areas where parking is limited, things can be hectic and crowded. Then you’re out in the elements waiting. It is very important to take care of yourself when you are on the crew. This means having your own food, staying hydrated, having your own gear to manage weather or conditions (i.e. sunscreen, bugspray, pop up tent, chairs, etc.).
Be prepared that your runner may hit a low. Every person handles this differently, but it can make an athlete slightly less pleasant or a little bit more brash in their words or behavior. Another joke is that crew members should never take anything personal that their athlete says or does when they are in a low or bonking during an ultramarathon. This isn’t saying that athletes can and should be rude to their crew, but it is the caution that this can be a possibility.
There are many benefits to crewing at an ultramarathon, but one of them is being able to observe athletes racing. Perhaps the race you are crewing at is one you hope to race yourself some day. You can learn a lot about how you’d want to execute the race, what mistakes people made and how to optimize your outcome, simply by getting to be on the other side of the race experience and witnessing others race (this extends beyond the athlete you are there supporting).
And that concludes our 3-part Series on Crewing for an Ultramarathon! If you have any questions or comments feel free to email us at info@wildpeakcollective.com and we’d be happy to chat further on this or any other topic related to training and preparing for an ultramarathon!

Brittany Peterson is a Running Coach at WildPeak Collective and a professional trail and ultra runner. She has had several wins in key races throughout the world and has been a 3-time finisher at the Western States Endurance Run, with 2 of her 3 results being in the top 5. She comes from a background of track and field and road marathon running as well and loves coaching athletes of all ages, abilities, in all terrains and with any goal in mind.
"Run Wild. Train with Purpose."


Comments